@dircategory User Interface Toolkit * GtkAda_Ug: (gtkada_ug). Ada graphical tookit based on GTK+ (User's Guide)
Copyright (C) 1998-2000, Emmanuel Briot, Joel Brobecker, Arnaud Charlet
Copyright (C) 2000-2011, AdaCore
Permission is granted to copy, distribute and/or modify this document under the terms of the GNU Free Documentation License, Version 1.1 or any later version published by the Free Software Foundation; with the Invariant Sections being "GNU Free Documentation License", with the Front-Cover Texts being "GtkAda User's Guide", and with no Back-Cover Texts. A copy of the license is included in the section entitled "GNU Free Documentation License".
GtkAda is a high-level portable graphical toolkit, based on the gtk+ toolkit, one of the official GNU toolkits. It makes it easy to create portable user interfaces for multiple platforms, including most platforms that have a X11 server and Win32 platforms.
Although it is based on a C library, GtkAda uses some advanced Ada features such as tagged types, generic packages, access to subprograms, and exceptions to make it easier to use and design interfaces. For efficiency reasons, it does not use controlled types, but takes care of all the memory management for you in other ways.
As a result, this library provides a secure, easy to use and extensible toolkit.
Compared to the C library, GtkAda provides type safety (especially in the callbacks area), and object-oriented programming. As opposed to common knowledge, it requires less type casting than with in C. Its efficiency is about the same as the C library through the use of inline subprograms.
GtkAda comes with a complete integration to the graphical interface
builder Glad. This makes it even easier to develop interfaces,
since you just have to click to create a description of the window and all
the dialogs. Ada code can simply import that description to bring the windows
to life.
Under some platforms, GtkAda also provides a bridge to use OpenGL, with which you can create graphical applications that display 3D graphics, and display them in a GtkAda window, as with any other 2D graphics. This manual does not document OpenGL at all, see any book on OpenGL, or the specification that came with your OpenGL library, for more information.
The following Internet sites will always contain the latest public
packages for GtkAda, gtk+, Glade and Cairo
http://libre.adacore.com/libre/tools/GtkAda/
The scheme used for GtkAda's version numbers is the following: the major and minor version number is the same as for the underlying gtk+ library (e.g 2.18). The micro version number depends on GtkAda's release number.
This toolkit was tested on the following systems:
with the latest version of the GNAT compiler, developed and supported by
Ada Core Technologies (see http://www.adacore.com).
This version of GtkAda is known to be compatible with gtk+ 2.16.x
and 2.18.x.
This release may or may not be compatible with older versions of gtk+.
This version of GtkAda is compatible with Glade version
3.7.3.
This document does not describe all the widgets available in GtkAda, nor does it try to explain all the subprograms. The GtkAda Reference Manual provides this documentation instead, as well as the GtkAda sources spec files themselves, whose extension is `.ads'.
No complete example is provided in this documentation. Instead, please refer to the examples that you can find in the `testgtk/' and `examples/' directory in the GtkAda distribution, since these are more up-to-date (and more extensive). They are heavily commented, and are likely to contain a lot of information that you might find interesting.
If you are interested in getting support for GtkAda--including priority bug fixes, early releases, help in using the toolkit, help in designing your interface, and on site consulting--please contact AdaCore (mailto:sales@adacore.com).
This chapter describes how to start a new GtkAda application. It explains the basic features of the toolkit, and shows how to compile and run your application.
It also gives a brief overview of the extensive widget hierarchy available in GtkAda.
This section explains how to build and install GtkAda on your machine.
On Windows systems, we provide an automatic installer that installs
GtkAda along with dependent components like gtk+ libraries and
Glade. If you are a Windows user, you can skip the rest of
this section which will address installation on Unix systems.
On Unix systems, you first need to install the glib and gtk+ libraries. Download the compatible packages from the gtk+ web site (http://www.gtk.org), compile and install it. Alternatively, if your operating system vendor provides glib and gtk+ development packages, you can install the libraries they provide.
Change your PATH environment variable so that the script pkg-config,
which indicates where gtk+ was installed and what libraries it needs is
automatically found by GtkAda. You will no longer need this script once
GtkAda is installed, unless you develop part of your application in C.
OpenGL support will not be activated in GtkAda unless you already have the OpenGL libraries on your systems. You can for instance look at Mesa, which is free implementation.
Optionally, you can also install the Glade interface builder. Get
the compatible package from the Glade web site, compile and install it.
You can finally download the latest version of GtkAda from the web site. Untar and uncompress the package, then simply do the following steps:
$ ./configure
$ make
$ make tests     (this step is optional)
$ make install
As usual with the configure script, you can specify where you want
to install the GtkAda libraries by using the --prefix switch.
You can specify the switch --disable-shared to prevent building
shared libraries, even if your system supports them (by default, both
shared and static libraries are installed). By default, your application
will be linked statically with the GtkAda libraries. You can override this
default by specifying --enable-shared as a switch to configure,
although you can override it later through the LIBRARY_TYPE scenario
variable.
If you have some OpenGL libraries installed on your system, you can make
sure that configure finds them by specifying the
--with-GL-prefix switch on the command line. configure
should be able to automatically detect the libraries however.
You must then make sure that the system will be able to find the dynamic libraries at run time if your application uses them. Typically, you would do one of the following:
ldconfig if you installed GtkAda in one of the standard
location and you are super-user on your machine
/etc/ld.conf if you are super-user but did not install
GtkAda in one of the standard location. Add the path that contains
libgtkada.so (by default `/usr/local/lib' or `$prefix/lib'.
LD_LIBRARY_PATH environment variable if you are
not super-user. You should simply add the path to libgtkada.
In addition, if you are using precompiled Gtk+ binary packages, you will
also need to set the FONTCONFIG_FILE environment variable to point to
the `prefix/etc/fonts/fonts.conf' file of your binary installation.
For example, assuming you have installed Gtk+ under `/opt/gtk' and using bash:
$ export FONTCONFIG_FILE=/opt/gtk/etc/fonts/fonts.conf
If your application is using printing, on UNIX and Linux you will need to point your environment variable GTK_EXE_PREFIX to the root directory of your Gtk+ installation:
$ export GTK_EXE_PREFIX=/opt/gtk/
Since GtkAda depends on Gtk+, you usually need to distribute some Gtk+ libraries along with your application.
Under some OSes such as Linux, Gtk+ comes preinstalled, so in this case, a simple solution is to rely on the preinstalled Gtk+ libraries. See below for more information on the gtkada library itself.
Under other unix systems, GtkAda usually comes with a precompiled set of Gtk+ libraries that have been specifically designed to be easily redistributed.
In order to use the precompiled Gtk+ binaries that we distribute with GtkAda, you need to distribute all the Gtk+ .so libraries along with your application, and use the LD_LIBRARY_PATH environment variable to point to these libraries.
The list of libraries needed is `<gtkada-prefix>/lib/lib*.so.?' along with your executable, and set LD_LIBRARY_PATH.
You may also need the `libgtkada-xxx.so' file. This dependency
is optional since gtkada supports both static and dynamic linking, so
by e.g. using gtkada-config --static or by using
`gtkada_static.gpr', you will end up linking with `libgtkada.a'.
Under Windows, you need to distribute the following files and directories along with your application, and respect the original directory set up:
In addition to the full sources, the GtkAda package contains a lot of heavily commented examples. If you haven't been through those examples, we really recommend that you look at them and try to understand them, since they contain some examples of code that you might find interesting for your own application.
testgtk that tests all the
widgets in GtkAda. It gives you a quick overview of what can be found in the
toolkit, as well as some detailed information on the widgets and their
parameters.
Each demo is associated with contextual help pointing to aspects worth
studying.
It also contains an OpenGL demo, if GtkAda was compiled with support for
OpenGL.
This program is far more extensive that its C counterpart, and the GtkAda
team has added a lot of new examples.
This directory also contains the application testcairo which
demonstrates the use of various Cairo functions in GtkAda.
This section explains how you can compile your own applications.
There are several ways to use GtkAda in your applications
A set of project files is installed along with GtkAda. If you have installed GtkAda in the same location as GNAT itself, nothing else needs to be done.
Otherwise, you need to make the directory that contains these project files
visible to the compiler. This is done by adding the directory to the
ADA_PROJECT_PATH environment variable. Assuming you have installed the
library in `prefix', the directory you need to add is
`prefix/lib/gnat'.
On Unix, this is done with
csh:
   setenv ADA_PROJECT_PATH $prefix/lib/gnat:$ADA_PROJECT_PATH
sh:
   ADA_PROJECT_PATH=$prefix/lib/gnat:$ADA_PROJECT_PATH
   export ADA_PROJECT_PATH
To build your own application, you should then setup a project file (see the GNAT documentation for more details on project files), which simply contains the statement
with "gtkada";
This will automatically set the right compiler and linker options, so that your application is linked with GtkAda.
By default, the linker will use GtkAda's shared library, if it was built. If you would prefer to link with the static library, you can set the environment variable LIBRARY_TYPE=static export LIBRARY_TYPE before launching the compiler or linker, which will force it to use the static library instead.
The procedure is system-dependent, and thus is divided into two subsections.
On Unix systems, a script called gtkada-config is automatically
created when you build GtkAda. This script is copied in a subdirectory
`bin/' in the installation directory.
The easiest and recommended way to build a GtkAda application is to
use the gnatmake program distributed with GNAT, that takes care of
all the dependencies for you. Use the gtkada-config to specify
where GtkAda and gtk+ libraries have been installed.
> gnatmake <main-file> `gtkada-config`
Note the use of back-ticks around gtkada-config, which force the shell to evaluate the script and put the output on the command line.
However, on complex systems, gnatmake might not be enough. Users frequently
like to create Makefiles. The script gtkada-config remains
useful in that case, since you can call it from your Makefile (same
syntax as above with the back-ticks) to create variables like FLAGS and
LIBS. See the switches of gtkada-config below for more information.
The script gtkada-config understands the following command line
switches (chosen to be compatible with the ones set by gtk-config):
--cflags: Output only the compiler flags, i.e the include
directories where the GtkAda spec files are found. This should be used
if you only want to compile your files, but do not want to bind or link
them.
--libs: Output only the switches for the linker. This lists
the directories where all the GtkAda, gtk+, and dependant libraries are
found. For instance, if GtkAda was compiled with support for OpenGL,
the OpenGL libraries will automatically be present.
--static: Forces linking with the static gtkada library. This
option will still use the dynamic gtk+ libraries.
Things are somewhat easier on Windows systems. You don't have access to the
gtkada-config script. On the other hand you also don't
have to specify which libraries to use or where to find them.
The only thing you should specify on the gnatmake command line is
where the GtkAda spec files are found, as in:
> gnatmake <main-file> -Ic:\gtkada\include\gtkada
if GtkAda was installed under `c:\gtkada'.
The gtk+ toolkit has been designed from the beginning to be portable.
It is made of two libraries: gtk and gdk.
In addition, GtkAda provides binding to three supporting libraries:
pango, cairo and glib.
Glib is a non-graphical library that includes support for lists,
h-tables, threads, and so on. It is a highly optimized,
platform-independent library. Since most of its contents are already
available in Ada (or in the `GNAT.*' hierarchy in the GNAT
distribution), GtkAda does not include a complete binding to it.
For the parts of Glib that we do depend on, we provide
`Glib.*' packages in the GtkAda distribution.
Gdk is the platform-dependent part of gtk+, and so there are
different implementations (for instance, for Win32 and X11 based
systems) that implement a common API. Gdk provides basic
graphical functionality to, for instance, draw lines, rectangles and
pixmaps on the screen, as well as manipulate colors. The `Gdk.*'
packages provide a full Ada interface to Gdk.
Pango is a modern font handling system. Bindings in GtkAda
gives access to the API to manipulate font descriptions and text
attributes.
Cairo is the low-level 2D drawing library used by Gdk to
render widgets. Cairo provides a rich set of vector drawing
features, supporting anti-aliasing, transparency, and 2D matrix
transformations.The `Cairo.*' packages provide a complete Ada
binding to Cairo.
Gtk is the top level library. It is platform independent, and
does all its drawing through calls to Gdk and Cairo. This is where the
high-level widgets are defined. It also includes support for callbacks. Its
equivalent in the GtkAda libraries are the `Gtk.*' packages. It is
made of a fully object-oriented hierarchy of widgets (see section Widgets Hierarchy).
Since your application only calls GtkAda, it is fully portable, and can be recompiled as-is on other platforms.
+------------------------------- ----------+
|             Your Application             |
+------------------------------------------+
|                 GtkAda                   |
|              +-----------------+         |
|              |      GTK        |         |
|         +----+-----------------+----+    |
|         |           GDK             |    |
|    +----+------+         +----------+----+
|    |   Pango   |         |     Cairo     |
+----+-----------+----+----+---------------+
|        GLIB         |   X-Window / Win32  |
+---------------------+--------------------+
Although the packages have been evolving a lot since the first versions of GtkAda, the specs are stabilizing now. We will try as much as possible to provide backward compatibility whenever possible.
Since GtkAda is based on gtk+ we have tried to stay as close to it as possible while using high-level features of the Ada language. It is thus relatively easy to convert external examples from C to Ada.
We have tried to adopt a consistent naming scheme for Ada identifiers:
Gtk_Button Gtk_Color_Selection_Dialog
Gtk.GEntry.Gtk_Entry Gtk.GRange.Gtk_Range
gtk_ and the widget name, e.g
gtk_misc_set_padding        =>  Gtk.Misc.Set_Padding
gtk_toggle_button_set_state =>  Gtk.Toggle_Button.Set_State
Gtk.Main.Timeout), the idle functions
(see Gtk.Main.Idle), and the data that can be attached to any object
(see Gtk.Object.User_Data). Type safety is ensured through these
generic packages.
WARNING: all the generic packages allocate some memory for internal structures, and call internal functions. This memory is freed by gtk itself, by calling some Ada functions. Therefore the generic packages have to be instantiated at library level, not inside a subprogram, so that the functions are still defined when gtk needs to free the memory.
WARNING Before any other call to the GtkAda library is performed,
Gtk.Main.Init must be invoked first. Most of the time, this
procedure is invoked from the main procedure of the application, in
which case no use of GtkAda can be done during the application
elaboration.
All widgets in GtkAda are implemented as tagged types. They all have
a common ancestor, called Gtk.Object.Gtk_Object. All visual objects
have a common ancestor called Gtk.Widget.Gtk_Widget.
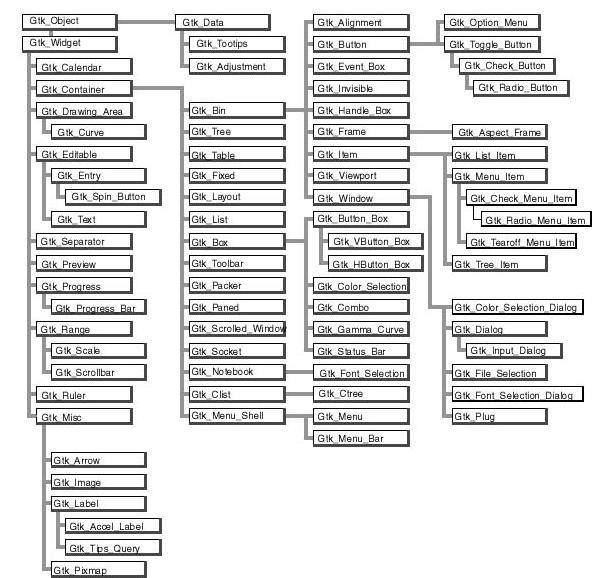
The following table describes the list of objects and their inheritance tree. As usual with tagged types, all the primitive subprograms defined for a type are also known for all of its children. This is a very powerful way to create new widgets, as will be explained in section Creating new widgets in Ada.
Although gtk+ was written in C its design is object-oriented, and thus
GtkAda has the same structure. The following rules have been applied to
convert from C names to Ada names: a widget Gtk_XXX is defined in
the Ada package Gtk.XXX, in the file `gtk-xxx.ads'. This
follows the GNAT convention for file names. For instance, the
Gtk_Text widget is defined in the package Gtk.Text, in the
file `gtk-text.ads'.
Note also that most of the documentation for GtkAda is found in the spec files themselves.
It is important to be familiar with this hierarchy. It is then easier to know how to build and organize your windows. Most widgets are demonstrated in the `testgtk/' directory in the GtkAda distribution.
Hierarchy of widgets in GtkAda
Interfaces in GtkAda are built in layers, as in Motif. For instance, a typical dialog is basically a Gtk_Window, that in turn contains a Gtk_Box, itself divided into two boxes and a Gtk_Separator, and so on.
Altough this may seem more complicated than setting absolute positions for children, this is the simplest way to automatically handle the resizing of windows. Each container that creates a layer knows how it should behave when it is resized, and how it should move its children. Thus almost everything is handled automatically, and you don't have to do anything to support resizing.
If you really insist on moving the children to a specific position, look
at the Gtk_Fixed widget and its demo in `testgtk/'. But you
really should not use this container, since you will then have to do
everything by hand.
All the containers are demonstrated in `testgtk/', in the GtkAda distribution. This should help you understand all the parameters associated with the containers. It is very important to master these containers, since using the appropriate containers will make building interfaces a lot easier.
If you look at the widget hierarchy (see section Widgets Hierarchy), you can see that a Gtk_Window inherits from Gtk_Bin, and thus can have only one child. In most cases, the child of a Gtk_Window will thus be a Gtk_Box, which can have any number of children.
Some widgets in GtkAda itself are built using this strategy, from the
very basic Gtk_Button to the more advanced
Gtk_File_Selection.
For example, by default a Gtk_Button contains a Gtk_Label, which displays the text of the button (like "OK" or "Cancel").
However, it is easy to put a pixmap in a button instead. When you create the button, do not specify any label. Thus, no child will be added, and you can give it your own. See `testgtk/create_pixmap.adb' for an example on how to do that.
In GtkAda, the interaction between the interface and the core application is done via signals. Most user actions on the graphical application trigger some signals to be `emitted'.
A signal is a message that an object wants to broadcast. It is identified by its name, and each one is associated with certain events which happen during the widget's lifetime. For instance, when the user clicks on a Gtk_Button, a "clicked" signal is emitted by that button. More examples of signals can be found in the GtkAda reference manual.
It is possible to cause the application to react to such events by `connecting' to a signal a special procedure called a `handler' or `callback'. This handler will be called every time that signal is emitted, giving the application a chance to do any processing it needs. More than one handler can be connected to the same signal on the same object; the handlers are invoked in the order they were connected.
Widgets, depending on their type, may define zero or more different signals. The signals defined for the parent widget are also automatically inherited; thus every widget answers many signals.
The easiest way to find out which signals can be emitted by a widget is to
look at the GtkAda reference manual. Every widget will
be documented there. The GtkAda RM explains when particular signals are
emitted, and the general form that their handlers should have (although
you can always add a User_Data if you wish, see below).
You can also look directly at the C header files distributed with the gtk+ library. Each widget is described in its own C file and has two C structures associated with it. One of them is the "class" structure, which contains a series of pointers to functions. Each of these functions has the same name as the signal name.
For instance, consider the following extract from gtkbutton.h:
struct _GtkButtonClass
{
  GtkBinClass        parent_class;

  void (* pressed)  (GtkButton *button);
  void (* released) (GtkButton *button);
  void (* clicked)  (GtkButton *button);
  void (* enter)    (GtkButton *button);
  void (* leave)    (GtkButton *button);
};
This means that the Gtk_Button widget redefines five new signals
called pressed, released, and so on, respectively.
The profile of the handler can also be deduced from those pointers:
The handler has the same arguments, plus an optional User_Data parameter
that can be used to pass any kind of data to the handler. When the
User_Data parameter is used, the value of this data is specified when
connecting the handler to the signal. It is then given back to the
handler when the signal is raised.
Therefore, the profile of a handler should look like:
procedure Pressed_Handler
  (Button    : access Gtk_Button_Record'Class;
   User_Data : ...);
The callback does not need to use all the arguments. It is legal to use
a procedure that "drops" some of the last arguments.
There is one special case, however: if, at connection time, you decided to
use User_Data, your callback must handle it. This is checked by
the compiler.
Any number of arguments can be dropped as long as those arguments are the last ones in the list and you keep the first one. For instance, the signal "button_press_event" normally can be connected to a handler with any of the following profiles:
--  with a user_data argument
procedure Handler
  (Widget    : access Gtk_Widget_Record'Class;
   Event     : Gdk.Event.Gdk_Event;
   User_Data : ...);
procedure Handler
  (Widget    : access Gtk_Widget_Record'Class;
   User_Data : ...);

--  without a user_data argument
procedure Handler
  (Widget : access Gtk_Widget_Record'Class;
   Event  : Gdk.Event.Gdk_Event);
procedure Handler (Widget : access Gtk_Widget_Record'Class);
Beware that adding new arguments is not possible, since no value would
be provided for them. When connecting a handler, GtkAda will not always
verify that your handler does not have more arguments than expected, so
caution is recommended (it only does so if you use the Gtk.Marshallers
package, see below).
All signal handling work is performed using services provided
by the Gtk.Handlers package. This package is self-documented,
so please read the documentation for this package either in the GtkAda
Reference Manual or in the specs themselves. The rest of this section assumes
that you have this documentation handy.
A short, annotated example of connecting signals follows; a complete example can be found in create_file_selection.adb (inside the `testgtk/' directory). In our example, an application opens a file selector to allow the user to select a file. GtkAda provides a high-level widget called Gtk_File_Selection which can be used in this case:
declare
   Window : Gtk_File_Selection;
begin
   Gtk.File_Selection.Gtk_New (Window, Title => "Select a file");
end;
When the "OK" button is pressed, the application needs to retrieve the selected file and then close the dialog. The only information that the handler for the button press needs is which widget to operate upon. This can be achieved by the following handler:
procedure OK (Files : access Gtk_File_Selection_Record'Class) is
begin
   Ada.Text_IO.Put_Line ("Selected " & Get_Filename (Files));
   --  Prints the name of the selected file.
   Destroy (Files);
   --  Destroys the file selector dialog
end Ok;
We now need to connect the object we created in the first part with the
new callback we just defined. Gtk.Handlers defines four types of
generic packages, depending on the arguments one expects in the callback and
whether the callback returns a value or not. Note that you can not
use an arbitrary list of arguments; this depends on the signal, as
explained in the previous section.
In our example, since the callback does not return any value and does not
handle any User_Data (that is, we don't pass it extra data,
which will be specified at connection time), the appropriate package
to use is Gtk.Handlers.Callback. We thus instantiate that package.
Remember that generic package instantiations in GtkAda must be present in memory at all times, since they take care of freeing allocated memory when finished. GtkAda generic package instantiations must therefore always be performed at the library level, and not inside any inner block.
package Files_Cb is new
  Handlers.Callback (Gtk_File_Selection_Record);
The Files_Cb package now provides a set of Connect subprograms
that can be used to establish a tie between a widget and a handler.
It also provides a set of other subprograms which you can use to emit
the signals manually, although most of the time, the signals are simply
emitted internally by GtkAda. We will not discuss the Emit_By_Name
subprograms here.
The general form of handler, as used in Gtk.Handlers, expects some
handlers that take two or three arguments: the widget on which the
signal was applied, an array of all the extra arguments sent internally
by GtkAda, and possibly some user data given when the connection was
made.
This is the most general form of handler and it covers all the possible
cases. However, it also expects the user to manually extract the needed
values from the array of arguments. This is not always the most convenient
solution. This is why GtkAda provides a second package related to signals,
Gtk.Marshallers.
The Gtk.Marshallers package provides a set of functions that can
be used as callbacks directly for GtkAda, and that will call your
application's handlers after extracting the required values from the array of
arguments. Although this might sound somewhat complicated, in practice
it simplifies the task of connecting signals. In fact, the techniques
employed are similar to what is done internally by gtk+ in C. Because of
the similarity of techniques, there is no overhead involved in using
Gtk.Marshallers with Ada over the C code in gtk+.
A set of functions To_Marshaller is found in every generic package
in Gtk.Handlers. They each take a single argument, the name of the
function you want to call, and return a handler that can be used directly in
Connect.
The connection is then done with the following piece of code:
Files_Cb.Object_Connect
  (Get_Ok_Button (Window),  --  The object to connect to the handler
   "clicked",               --  The name of the signal
   Files_Cb.To_Marshaller (Ok'Access),  --  The signal handler
   Slot_Object => Window);
Note that this can be done just after creating the widget, in the same block. As soon as it is created, a widget is ready to accept connections (although no signals will be emitted before the widget is shown on the screen).
We use To_Marshaller since our handler does not accept the array
of arguments as a parameter, and we use the special
Object_Connect procedure. This means that the parameter to
our callback (Files) will be the Slot_Object given in Object_Connect,
instead of being the button itself.
As described above, it is possible to define some data that is that
passed to the callback when it is called. This data is called
user_data, and is passed to the Connect or
Object_Connect subprograms.
GtkAda will automatically free any memory it has allocated internally
to store this user data. For instance, if you instantiated the
generic package User_Callback with a String, it means that you
want to be able to have a callback of the form:
   procedure My_Callback (Widget : access Gtk_Widget_Record'Class;
                           User_Data : String);
and connect it with a call similar to:
   Connect (Button, "Clicked", To_Marshaller (My_Callback'Access),
            User_Data => "any string");
GtkAda needs to allocate some memory to store the string (an unconstrained type). However, this memory is automatically freed when the callback is destroyed.
There are a few subtleties in the use of user_data, most importantly when the user data is itself a widget.
The following four examples do exactly the same thing: each creates two buttons, where clicking on the first one will destroy the second one. They all work fine the first time, while both buttons exist. However, some of them will fail if you press on the first button a second time.
Complete, compilable source code for these examples can be found in the distribution's `examples/user_data' directory, from which the code samples below are excerpted.
This code will fail: even after Button2 is destroyed, the Ada
pointer continues to reference memory that has been deallocated. The
second call to Destroy will fail with a Storage_Error.
   package User_Callback is new Gtk.Handlers.User_Callback
     (Gtk_Widget_Record, Gtk_Widget);

   procedure My_Destroy2
     (Button : access Gtk_Widget_Record'Class; Data : Gtk_Widget) is
   begin
      Destroy (Data);
   end My_Destroy2;

   begin
      User_Callback.Connect
        (Button1, "clicked",
         User_Callback.To_Marshaller (My_Destroy2'Access),
         Gtk_Widget (Button2));
   end;
One of the solutions to fix the above problem is to use
Object_Connect instead of Connect. In that case, GtkAda
automatically takes care of disconnecting the callback when either of
the two widgets is destroyed.
   procedure My_Destroy (Button : access Gtk_Widget_Record'Class) is
   begin
      Destroy (Button);
   end My_Destroy;

   begin
      Widget_Callback.Object_Connect
        (Button1, "clicked",
         Widget_Callback.To_Marshaller (My_Destroy'Access),
         Button2);
   end;
Using Object_Connect is not always possible. In that case, one
of the possibilities is to store the Id of the callback, and
properly disconnect it when appropriate. This is the most complex
method, and very often is not applicable, since you cannot know for
sure when the callback is no longer needed.
   type My_Data3 is record
      Button, Object : Gtk_Widget;
      Id             : Handler_Id;
   end record;
   type My_Data3_Access is access My_Data3;

   package User_Callback3 is new Gtk.Handlers.User_Callback
     (Gtk_Widget_Record, My_Data3_Access);

   procedure My_Destroy3
     (Button : access Gtk_Widget_Record'Class;
      Data   : My_Data3_Access) is
   begin
      Destroy (Data.Button);
      Disconnect (Data.Object, Data.Id);
   end My_Destroy3;

      Id : Handler_Id;
   begin
      Data3 := new My_Data3' (Object => Gtk_Widget (Button1),
                              Button => Gtk_Widget (Button2),
                              Id     => (Null_Signal_Id, null));
      Id := User_Callback3.Connect
        (Button1, "clicked",
         User_Callback3.To_Marshaller (My_Destroy3'Access),
         Data3);
      Data3.Id := Id;
   end;
GtkAda provides a function Add_Watch, that will automatically
disconnect a callback when a given widget is destroyed. This is the
function used internally by Object_Connect. In the example
below, the callback is automatically disconnected whenever
Button2 is destroyed.
   procedure My_Destroy2
     (Button : access Gtk_Widget_Record'Class; Data : Gtk_Widget) is
   begin
      Destroy (Data);
   end My_Destroy2;

      Id : Handler_Id;
   begin
      Id := User_Callback.Connect
        (Button1, "clicked",
         User_Callback.To_Marshaller (My_Destroy2'Access),
         Gtk_Widget (Button2));
      Add_Watch (Id, Button2);
   end;
You need to perform some initializations to start a GtkAda application:
--  predefined units of the library
with Gtk.Rc;
with Gtk.Main;
with Gtk.Enums;
with Gtk.Window;
...
--  My units
with Callbacks;
...
procedure Application is
   procedure Create_Window is ...

begin
   --  Set the locale specific datas (e.g time and date format)
   Gtk.Main.Set_Locale;

   --  Initializes GtkAda
   Gtk.Main.Init;

   --  Load the resources. Note that this part is optional.
   Gtk.Rc.Parse ("application.rc");

   --  Create the main window
   Create_Window;

   --  Signal handling loop
   Gtk.Main.Main;
end Application;
the Create_Window procedure looks like
   procedure Create_Window is
      Main_Window : Gtk.Window.Gtk_Window;
      ...
   begin
      Gtk.Window.Gtk_New
        (Window   => Main_Window,
         The_Type => Gtk.Enums.Window_Toplevel);

      --  From Gtk.Widget:
      Gtk.Window.Set_Title (Window => Main_Window, Title  => "Editor");

      --  Construct the window and connect various callbacks

      ...
      Gtk.Window.Show_All (Main_Window);
   end Create_Window;
Resource files let you parametrize aspects of the widgets in a GtkAda application without having to recompile it.
A resource file needs to be loaded (Gtk.Rc.Parse) before setting
the corresponding window.
In this file, it is possible to specify visual characteristics of
widgets, such as their colors and fonts.
Under X, the xfontsel command allows you to easily select a font.
The FontSelection widget is also a simple way to select fonts.
Here is an example of a resource file:
# application.rc
#
# resource file for "Application"

# Buttons style
style "button"
{
# BackGround Colors
#                  Red  Green  Blue
  bg[PRELIGHT] = { 0.0,  0.75, 0.0 } # Green when the mouse is on
                                     # the button
  bg[ACTIVE]   = { 0.75, 0.0,  0.0 } # Red on click
# ForeGround Colors
#                  Red  Green  Blue
  fg[PRELIGHT] = { 1.0,  1.0,  1.0 } # White when the mouse is on
                                     # the button
  fg[ACTIVE]   = { 1.0,  1.0,  1.0 } # White on click
}

# All the buttons will have the style "button"
widget_class "*GtkButton*" style "button"

# Text style
style "text"
{
  font = "-adobe-courier-medium-r-normal-*-15-*-*-*-*-*-*-*"
  text[NORMAL] = { 0.0, 0.0, 0.0 } # black
  fg[NORMAL]   = { 0.0, 0.0, 0.0 } # black
  base[NORMAL] = { 1.0, 1.0, 1.0 } # white : background color
}

# All Gtk_Text will have the "text" style
widget_class "*GtkText" style "text"
GtkAda takes care of almost all the memory management for you. Here is a brief overview of how this works, you'll have to check the sources if you want more detailed information. Gtk+ (the C library) does its own memory management through reference counting, i.e. any widget is destroyed when it is no longer referenced anywhere in the application.
In GtkAda itself, a "user_data" is associated with each object
allocated by a Gtk_New procedure. A "destroy" callback is also
associated, to be called when the object to which the
user_data belongs is destroyed.
Thus, every time a C object is destroyed, the equivalent Ada structure is also
destroyed (see Gtk.Free_User_Data).
Concerning widgets containing children, every container holds a reference to its children, whose reference counting is thus different from 0 (and generally 1). When the container is destroyed, the reference of all its children and grand-children is decremented, and they are destroyed in turn if needed. So the deallocation of a widget hierarchy is also performed automatically.
Note that Gtk+ under Windows does not interact properly with threads, so the only safe approach under this operating system is to perform all your Gtk+ calls in the same task.
On other platforms, the Glib library can be used in a task-safe mode by
calling Gdk.Threads.G_Init and Gdk.Threads.Init before
making any other Glib/Gdk calls.
Gdk routines may then be called simultaneously by multiple tasks, thanks to
task-safe construction of Gdk's internal data structures. However, Gdk objects
such as hash tables are not automatically protected, so it is the application's
responsibility to prevent simultaneous access to user-defined objects
(e.g. by using protected objects).
When Gdk is initialized to be task-safe, GtkAda becomes task aware. There is
a single global lock that you must acquire with Gdk.Threads.Enter before
making any Gdk/Gtk call, and which you must release with
Gdk.Threads.Leave afterwards.
Gtk.Main.Main should be called with the lock acquired (see example
below), ensuring that all the functions executed in the task that started
the main loop do not need to protect themselves again.
Beware that the GtkAda main loop (Gtk.Main.Main) can only be be
run inside
one specific task. In other words, you cannot call Gtk.Main.Main from
any task other than the one that started the outer level main loop.
Note that Gdk.Threads assumes that you are using a tasking run time
that maps Ada tasks to native threads.
A minimal main program for a tasking GtkAda application looks like:
with Gdk.Threads;
with Gtk.Main;
with Gtk.Enums; use Gtk.Enums;
with Gtk.Window; use Gtk.Window;

procedure GtkAda_With_Tasks is
   Window : Gtk_Window;
begin
   Gdk.Threads.G_Init;
   Gdk.Threads.Init;
   Gtk.Main.Init;

   Gtk_New (Window, Window_Toplevel);
   Show (Window);

   Gdk.Threads.Enter;
   Gtk.Main.Main;
   Gdk.Threads.Leave;
end GtkAda_With_Tasks;
Callbacks require a bit of attention. Callbacks from GtkAda (signals) are made
within the GtkAda lock. However, callbacks from Glib (timeouts, IO callbacks,
and idle functions) are made outside of the GtkAda lock. So, within a signal
handler you do not need to call Gdk.Threads.Enter, but within the other
types of callbacks, you do.
It often happens that your application, in addition to processing graphical events through the GtkAda main loop, also needs to monitor external events. This is the case if, for instance, you are running external processes and need to display their output, or if you are listening to incoming data on a socket. If you implement your own main loop to poll for these external events and then invoke the GUI, the GUI will enter its main loop and not return control back to you.
There are several ways to handle this situation:
Gtk.Main.Main_Iteration.
This second approach is not necessarily recommended, since you would
basically duplicate code that's already in gtk+ to manage the main
loop, and you also get finer control using idle and timeout callbacks
GtkAda has been designed from the beginning to provide a full object oriented layer over gtk+. This means that features such as type extension and dynamic dispatching are made available through the standard Ada language.
This section will describe how things work, how you can extend existing widgets, and even how to create your own widgets.
Every widget in the Gtk.* packages in GtkAda is a tagged type with a
number of primitive subprograms that are inherited by all of its children.
Tagged types in Ada make it possible to perform safe, automatic type
conversions without using explicit casts (such as is necessary when coding in
C). It is also possible for the compiler to verify whether or not these type
conversions are valid. Most errors are found at compile time, which leads to a
safer and more robust application.
As a further example, imagine a table that has been populated by some widgets. It is possible to query for this table's children and operate on these widgets without knowing details about their type, their creator, and so on--the tagged objects that are returned contain all the information necessary. It becomes possible to use dynamic dispatching without ever having to cast to a known type.
Modifying a standard widget to draw itself differently or display different data is easy using tagged types. Simply create a new type that extends the current one (see the section section Using tagged types to extend Gtk widgets below.
Creating a new reusable widget from scratch is also possible. Create a new tagged type and specify properties of the widget--such as how it is to draw itself and how it should react to events. See the section section Creating new widgets in Ada below.
Object oriented programming through the use of Ada tagged types makes GtkAda a very powerful, flexible, and safe tool for designing graphical interfaces.
There are three kinds of widgets that you can use with GtkAda:
GtkAda will always be able to find and/or create a valid tagged type in the first two cases, no matter if you explicitly created the widget or if it was created automatically by gtk+. For instance, if you created a widget in Ada, put it in a table, and later on extracted it from the table, then you will still have the same widget.
In the third case (third party C widgets), GtkAda is not, by default, able to create the corresponding Ada type.
The case of third party C widgets is a little bit trickier. Since GtkAda does not know anything about them when it is built, it can't magically convert the C widgets to Ada widgets. This is your job to teach GtkAda how to do the conversion.
We thus provide a 'hook' function which you need to modify. This function is defined in the package Glib.Type_Conversion. This function takes a string with the name of the C widget (ex/ "GtkButton"), and should return a newly allocated pointer. If you don't know this type either, simply return null.
With this toolkit, it's possible to associate your
own data with existing widgets simply by creating new types. This
section will show you a simple example, but you should rather read the
source code in the `testgtk/' directory where we used this feature
instead of using
user_data as is used in the C version.
type My_Button_Record is new Gtk_Button_Record with record
    --  whatever data you want to associate with your button
end record;
type My_Button is access all My_Button_Record'Class;
With the above statements, your new type is defined. Every function
available for Gtk_Button is also available for My_Button.
Of course, as with every tagged type in Ada, you can create your own
primitive functions with the following prototype:
procedure My_Primitive_Func (Myb : access My_Button_Record);
To instanciate an object of type My_Button in your application, do
the following:
declare
   Myb : My_Button;
begin
   Myb := new My_Button_Record;
   Initialize (Myb);   --  from Gtk.Button
end;
The first line creates the Ada type, whereas the Initialize call
actually creates the C widget and associates it with the Ada type.
With GtkAda, you can create widgets directly in Ada. These new widgets can be used directly, as if they were part of gtk itself.
Creating new widgets is a way to create reuseable components. You can
apply to them the same functions as you would for any other widget, such as
Show, Hide, and so on.
This section will explain how to create two types of widgets: composite widgets and widgets created from scratch. Two examples are provided with GtkAda, in the directories `examples/composite_widget' and `examples/base_widget'. Please also refer to the gtk+ tutorial, which describes the basic mechanisms that you need to know to create a widget.
A composite widget is a widget that does not do much by itself. Rather,
this is a collection of subwidgets grouped into a more general entity.
For instance, among the standard widgets, Gtk_File_Selection and
Gtk_Font_Selection belong to this category.
The good news is that there is nothing special to know. Just create a
new tagged type, extending one of the standard widgets (or even another
of your own widgets), provide a Gtk_New function that allocates
memory for this widget, and call the Initialize function that does
the actual creation of the widget and the subwidgets.
There is only one thing to do: Initialize should call the
parent class's Initialize function, to create the underlying C
widget.
The example directory `examples/composite_widget' reimplements the
Gtk_Dialog widget as written in C by the creators of gtk+.
Creating a working widget from scratch requires a certain level of familiary with the GtkAda signal mechanism and entails much work with low level signals. This is therefore not an activity recommended for novice GtkAda programmers.
Creating a widget from scratch is what you want to do if your widget should be drawn in a special way, should create and emit new signals, or otherwise perform differently than pre-existing widgets. The example we give in `examples/base_widget' is a small target on which the user can click, and that sends one of two signals: "bullseye" or "missed", depending on where the user has clicked.
See also the example in `examples/tutorial/gtkdial' for a more complex widget, that implements a gauge where the user can move the arrow to select a new value.
Once again, the only two functions that you must create are Gtk_New
and Initialize.
This time, Initialize has to do two things:
Parent_Package.Initialize (Widget);

--  The above line calls the Initialize function from the parent.
--  This creates the underlying C widget, which we are going to
--  modify with the following call:

Gtk.Object.Initialize_Class_Record
  (Widget, Signals, Class_Record);
--  This initializes the "class record" for the widget and
--  creates the signals.
In the above example, the new part is the second call. It takes three or four arguments:
Widget
This is the widget that you want to initialize
Signals
This is an array of string access containing the name of the signals
you want to create. For instance, you could create Signals with
Signals : Gtkada.Types.Chars_Ptr_Array := "bullseye" + "missed";This will create two signals, named "bullseye" and "missed", whose callbacks' arguments can be specified with the fourth parameter.
Class_Record
Every widget in C is associated with two records. The first one, which exists
only once per widget type, is the "class record". It contains the list of
signals that are known by this widget type, the list of default callbacks for
the signals, ...; the second record is an "instance record", which contains
data specific to a particular instance.
In GtkAda, the "instance record" is simply your tagged type and its fields.
The call to Initialize_Class_Record is provided to initialize the
"class record". As we said, there should be only one such record per widget
type. This parameter "Class_Record" will point to this records, once it is
created, and will be reused for every instanciation of the widget.
Parameters
This fourth argument is in fact optional, and is used to specify which
kind of parameters each new signal is expecting.
By default (ie if you don't give any value for this parameter), all the
signals won't expect any argument, except of course a possible user_data.
However, you can decide for instance that the first signal ("bullseye") should
in fact take a second argument (say a Gint), and that "missed" will take
two parameters (two Gints).
Parameters should thus contain a value of
(1 => (1 => Gtk_Type_Int, 2 => Gtk_Type_None),
 2 => (1 => Gtk_Type_Int, 2 => Gtk_Type_Int));
Due to the way arrays are handled in Ada, each component must have the same number of signals. However, if you specify a type of
Gtk_Type_None, this
will in fact be considered as no argument. Thus, the first signal above has
only one parameter.
Note also that to be able to emit a signal such a the second one, ie with
multiple arguments, you will have to extend the packages defined in
Gtk.Handlers. By default, the provided packages can only emit up to one
argument (and only for a few specific types). Creating your own
Emit_By_Name subprograms should not be hard if you look at what is done
in `gtk-marshallers.adb'. Basically, something like:
procedure Emit_With_Two_Ints
  (Object : access Widget_Type'Class;
   Name   : String;
   Arg1   : Gint;
   Arg2   : Gint);
pragma Import (C, Emit_With_Two_Ints,
    "gtk_signal_emit_by_name");

Emit_With_Two_Ints (Gtk.Get_Object (Your_Widget),
    "missed" & ASCII.NUL, 1, 2);
will emit the "missed" signal with the two parameters 1 and 2.
Then of course Initialize should set up some signal handlers for
the functions you want to redefine.
Three signals are especially useful:
procedure Size_Request
   (Widget      : access My_Widget_Record;
    Requisition : in out Gtk.Widget.Gtk_Requisition);
This function should modify Requisition to specify the widget's ideal
size. This might not be the exact size that will be set, since some
containers might decide to enlarge or to shrink it.
procedure Size_Allocate
   (Widget     : access My_Widget_Record;
    Allocation : in out Gtk.Widget.Gtk_Allocation)
This function should take the responsability to move the widget, using
for instance Gdk.Window.Move_Resize.
GtkAda now comes with support for the GUI builder Glade-3. Glade-3 provides a graphical interface for designing windows and dialogs. The interface description is saved in an XML file which can be loaded at run-time by your GtkAda application. With this approach, there is no need to write or generate Ada code to describe the interface, all is needed is to write the callbacks for various actions.
Under UNIX and Linux, Glade is invoked by the command-line script
glade-3 which is located in the bin directory of your GtkAda
installation.
Under Windows, Glade is invoked by clicking on the executable
glade-3.exe, also located in the bin directory of your GtkAda
installation.
In Glade-3 the interface is done by point-and-clicking. The first step is to create one or more toplevel window and then placing widgets in these windows.
Detailed tutorials can be found at: http://live.gnome.org/Glade/Tutorials
In the Preferences for your project (menu Edit->Preferences), make sure that the preference "Project file format" is set to "GtkBuilder".
Once the interface is built and saved in an XML file, you can use it in your
GtkAda application. You will need to use objects defined in the package
Gtkada.Builder to load the interface file and to connect subprograms
defined in your application to signals emitted by the interface. See the
detailed explanations and examples in gtkada-builder.ads
GtkAda comes with a Perl script to help you create a binding to a C widget (this is the script we have used ourselves). This will not fully automate the process, although it should really speed things up. You will probably need less than 15 min to create a new binding once you will get used to the way GtkAda works. Note that your C file should have the same format as is used by Gtk+ itself.
To get started on a new binding, launch the script `contrib/binding.pl' as follows:
$ touch gtk-button.ads
$ binding.pl ../include/gtk/gtkbutton.h > temporary
This dumps several kind of information on the standard output:
You can also use this script to update existing bindings:
$ binding.pl ../include/gtk/*.h
This chapter presents a number of technics that can be used when debugging GtkAda applications. First, the standard tools to debug Ada applications can be used:
gnatbind or gnatmake command
line will force the compiler to include backtraces when an exception is
raised. These backtraces can be converted to symbolic backtraces by
using the addr2line tool.
gnatmem tool, that helps
you to detect memory leaks or doubly-deallocated memory. The latter
often results in hard-to-fix Storage_Error exceptions. See the GNAT
User's guide for more information.
There are also a number of technics specific to GtkAda or gtk+ applications. For most of them, you might need to recompile these libraries with the appropriate switches to get access to the extended debugging features.
--sync switch
g_log. When gtk+ is linked dynamically, you will need
to first start your application with begin, then put the
breakpoint and continue the application with cont. This helps
understand internal errors or warnings reported by gtk+ and glib
--disable-mem-pools
MALLOC_CHECK_ to 1 to use
error-detecting algorithms (see the man page for malloc()).
--enable-debug=yes
configure
command line when compiling these two libraries.
In addition to compiling the libraries with debugging information for
the debugger, additional runtime debug options (controllable via
environment variables) become available.
Specifying --enable-debug=no is not recommended for production
releases (see glib or gtk+ documentation for details).
For these three variables, the possible values are given below. These
are lists of colon-separated keywords. You can choose to remove any of
these value from the variable
function Ref_Count (Add : System.Address) return Guint;
pragma Import (C, Ref_Count, "ada_gtk_debug_get_ref_count");
and should be called in a manner similar to
declare
   Widget : Gtk_Widget;
   Count  : Guint;
begin
   Count := Ref_Count (Get_Object (Widget));
end;
and returns the internal reference counter for the widget. When this counter reaches 0, the memory allocated for the widget is automatically freed. This is mostly a debugging aid for people writting their own containers, and shouldn't generally be needed. You shouldn't rely on the internal reference counter in your actual code, which is why it isn't exported by default in GtkAda.
GtkAda is a mature, stable toolkit that is heavily and widely used on a variety of platforms. We test GtkAda using an Ada version of the `testgtk.c' file found in the gtk+ distribution, as well as by generating a significant number of interfaces using the GUI builder and Gate. For code examples that demonstrate the use of this toolkit, look within the `testgtk/' directory.
There are two kinds of problems you can encounter:
g_log. Then run your program as usual,
using the run command. Then send us the result of the where
command. Here is a summary:
$ gnatmake -f -g <your_program_name> `gtkada-config`
$ gdb <your_program_name>
(gdb) break main
(gdb) run
(gdb) break g_log
(gdb) continue
....
(gdb) where
If you are a supported user of GNAT, send mail to
mailto:report@gnat.com to report errors, otherwise send mail
to the GtkAda list (mailto:gtkada@lists.adacore.com) explaining exactly
what your are doing, what is the expected result and what you
actually get. Please include the required sources to reproduce the
problem, in a format usable by gnatchop (basically, insert
all the required sources at the end of the mail). Please try to
provide as small as possible a subset of your sources.
Of course, we will welcome any patch you can provide, so that this toolkit may be as useful as possible.
We recommand the following documents. Most of them were written with C in mind, but should be easily adapted after you've read the rest of this document.
Gdk.Event.
It is worth noting that this book has been published under the Open
Publication License. You can get an electronic copy of it at
http://www.opencontent.org/.
Version 1.1, March 2000
Copyright (C) 2000 Free Software Foundation, Inc.
59 Temple Place, Suite 330, Boston, MA 02111-1307 USA
Everyone is permitted to copy and distribute verbatim copies
of this license document, but changing it is not allowed.
The purpose of this License is to make a manual, textbook, or other written document "free" in the sense of freedom: to assure everyone the effective freedom to copy and redistribute it, with or without modifying it, either commercially or noncommercially. Secondarily, this License preserves for the author and publisher a way to get credit for their work, while not being considered responsible for modifications made by others.
This License is a kind of "copyleft", which means that derivative works of the document must themselves be free in the same sense. It complements the GNU General Public License, which is a copyleft license designed for free software.
We have designed this License in order to use it for manuals for free software, because free software needs free documentation: a free program should come with manuals providing the same freedoms that the software does. But this License is not limited to software manuals; it can be used for any textual work, regardless of subject matter or whether it is published as a printed book. We recommend this License principally for works whose purpose is instruction or reference.
This License applies to any manual or other work that contains a notice placed by the copyright holder saying it can be distributed under the terms of this License. The "Document", below, refers to any such manual or work. Any member of the public is a licensee, and is addressed as "you".
A "Modified Version" of the Document means any work containing the Document or a portion of it, either copied verbatim, or with modifications and/or translated into another language.
A "Secondary Section" is a named appendix or a front-matter section of the Document that deals exclusively with the relationship of the publishers or authors of the Document to the Document's overall subject (or to related matters) and contains nothing that could fall directly within that overall subject. (For example, if the Document is in part a textbook of mathematics, a Secondary Section may not explain any mathematics.) The relationship could be a matter of historical connection with the subject or with related matters, or of legal, commercial, philosophical, ethical or political position regarding them.
The "Invariant Sections" are certain Secondary Sections whose titles are designated, as being those of Invariant Sections, in the notice that says that the Document is released under this License.
The "Cover Texts" are certain short passages of text that are listed, as Front-Cover Texts or Back-Cover Texts, in the notice that says that the Document is released under this License.
A "Transparent" copy of the Document means a machine-readable copy, represented in a format whose specification is available to the general public, whose contents can be viewed and edited directly and straightforwardly with generic text editors or (for images composed of pixels) generic paint programs or (for drawings) some widely available drawing editor, and that is suitable for input to text formatters or for automatic translation to a variety of formats suitable for input to text formatters. A copy made in an otherwise Transparent file format whose markup has been designed to thwart or discourage subsequent modification by readers is not Transparent. A copy that is not "Transparent" is called "Opaque".
Examples of suitable formats for Transparent copies include plain ASCII without markup, Texinfo input format, LaTeX input format, SGML or XML using a publicly available DTD, and standard-conforming simple HTML designed for human modification. Opaque formats include PostScript, PDF, proprietary formats that can be read and edited only by proprietary word processors, SGML or XML for which the DTD and/or processing tools are not generally available, and the machine-generated HTML produced by some word processors for output purposes only.
The "Title Page" means, for a printed book, the title page itself, plus such following pages as are needed to hold, legibly, the material this License requires to appear in the title page. For works in formats which do not have any title page as such, "Title Page" means the text near the most prominent appearance of the work's title, preceding the beginning of the body of the text.
You may copy and distribute the Document in any medium, either commercially or noncommercially, provided that this License, the copyright notices, and the license notice saying this License applies to the Document are reproduced in all copies, and that you add no other conditions whatsoever to those of this License. You may not use technical measures to obstruct or control the reading or further copying of the copies you make or distribute. However, you may accept compensation in exchange for copies. If you distribute a large enough number of copies you must also follow the conditions in section 3.
You may also lend copies, under the same conditions stated above, and you may publicly display copies.
If you publish printed copies of the Document numbering more than 100, and the Document's license notice requires Cover Texts, you must enclose the copies in covers that carry, clearly and legibly, all these Cover Texts: Front-Cover Texts on the front cover, and Back-Cover Texts on the back cover. Both covers must also clearly and legibly identify you as the publisher of these copies. The front cover must present the full title with all words of the title equally prominent and visible. You may add other material on the covers in addition. Copying with changes limited to the covers, as long as they preserve the title of the Document and satisfy these conditions, can be treated as verbatim copying in other respects.
If the required texts for either cover are too voluminous to fit legibly, you should put the first ones listed (as many as fit reasonably) on the actual cover, and continue the rest onto adjacent pages.
If you publish or distribute Opaque copies of the Document numbering more than 100, you must either include a machine-readable Transparent copy along with each Opaque copy, or state in or with each Opaque copy a publicly-accessible computer-network location containing a complete Transparent copy of the Document, free of added material, which the general network-using public has access to download anonymously at no charge using public-standard network protocols. If you use the latter option, you must take reasonably prudent steps, when you begin distribution of Opaque copies in quantity, to ensure that this Transparent copy will remain thus accessible at the stated location until at least one year after the last time you distribute an Opaque copy (directly or through your agents or retailers) of that edition to the public.
It is requested, but not required, that you contact the authors of the Document well before redistributing any large number of copies, to give them a chance to provide you with an updated version of the Document.
You may copy and distribute a Modified Version of the Document under the conditions of sections 2 and 3 above, provided that you release the Modified Version under precisely this License, with the Modified Version filling the role of the Document, thus licensing distribution and modification of the Modified Version to whoever possesses a copy of it. In addition, you must do these things in the Modified Version:
If the Modified Version includes new front-matter sections or appendices that qualify as Secondary Sections and contain no material copied from the Document, you may at your option designate some or all of these sections as invariant. To do this, add their titles to the list of Invariant Sections in the Modified Version's license notice. These titles must be distinct from any other section titles.
You may add a section entitled "Endorsements", provided it contains nothing but endorsements of your Modified Version by various parties -- for example, statements of peer review or that the text has been approved by an organization as the authoritative definition of a standard.
You may add a passage of up to five words as a Front-Cover Text, and a passage of up to 25 words as a Back-Cover Text, to the end of the list of Cover Texts in the Modified Version. Only one passage of Front-Cover Text and one of Back-Cover Text may be added by (or through arrangements made by) any one entity. If the Document already includes a cover text for the same cover, previously added by you or by arrangement made by the same entity you are acting on behalf of, you may not add another; but you may replace the old one, on explicit permission from the previous publisher that added the old one.
The author(s) and publisher(s) of the Document do not by this License give permission to use their names for publicity for or to assert or imply endorsement of any Modified Version.
You may combine the Document with other documents released under this License, under the terms defined in section 4 above for modified versions, provided that you include in the combination all of the Invariant Sections of all of the original documents, unmodified, and list them all as Invariant Sections of your combined work in its license notice.
The combined work need only contain one copy of this License, and multiple identical Invariant Sections may be replaced with a single copy. If there are multiple Invariant Sections with the same name but different contents, make the title of each such section unique by adding at the end of it, in parentheses, the name of the original author or publisher of that section if known, or else a unique number. Make the same adjustment to the section titles in the list of Invariant Sections in the license notice of the combined work.
In the combination, you must combine any sections entitled "History" in the various original documents, forming one section entitled "History"; likewise combine any sections entitled "Acknowledgements", and any sections entitled "Dedications". You must delete all sections entitled "Endorsements."
Heading 6. COLLECTIONS OF DOCUMENTS
You may make a collection consisting of the Document and other documents released under this License, and replace the individual copies of this License in the various documents with a single copy that is included in the collection, provided that you follow the rules of this License for verbatim copying of each of the documents in all other respects.
You may extract a single document from such a collection, and distribute it individually under this License, provided you insert a copy of this License into the extracted document, and follow this License in all other respects regarding verbatim copying of that document.
A compilation of the Document or its derivatives with other separate and independent documents or works, in or on a volume of a storage or distribution medium, does not as a whole count as a Modified Version of the Document, provided no compilation copyright is claimed for the compilation. Such a compilation is called an "aggregate", and this License does not apply to the other self-contained works thus compiled with the Document, on account of their being thus compiled, if they are not themselves derivative works of the Document.
If the Cover Text requirement of section 3 is applicable to these copies of the Document, then if the Document is less than one quarter of the entire aggregate, the Document's Cover Texts may be placed on covers that surround only the Document within the aggregate. Otherwise they must appear on covers around the whole aggregate.
Translation is considered a kind of modification, so you may distribute translations of the Document under the terms of section 4. Replacing Invariant Sections with translations requires special permission from their copyright holders, but you may include translations of some or all Invariant Sections in addition to the original versions of these Invariant Sections. You may include a translation of this License provided that you also include the original English version of this License. In case of a disagreement between the translation and the original English version of this License, the original English version will prevail.
You may not copy, modify, sublicense, or distribute the Document except as expressly provided for under this License. Any other attempt to copy, modify, sublicense or distribute the Document is void, and will automatically terminate your rights under this License. However, parties who have received copies, or rights, from you under this License will not have their licenses terminated so long as such parties remain in full compliance.
The Free Software Foundation may publish new, revised versions of the GNU Free Documentation License from time to time. Such new versions will be similar in spirit to the present version, but may differ in detail to address new problems or concerns. See http://www.gnu.org/copyleft/.
Each version of the License is given a distinguishing version number. If the Document specifies that a particular numbered version of this License "or any later version" applies to it, you have the option of following the terms and conditions either of that specified version or of any later version that has been published (not as a draft) by the Free Software Foundation. If the Document does not specify a version number of this License, you may choose any version ever published (not as a draft) by the Free Software Foundation.
To use this License in a document you have written, include a copy of the License in the document and put the following copyright and license notices just after the title page:
Copyright (c) YEAR YOUR NAME.
Permission is granted to copy, distribute and/or modify this document under the terms of the GNU Free Documentation License, Version 1.1 or any later version published by the Free Software Foundation; with the Invariant Sections being LIST THEIR TITLES, with the Front-Cover Texts being LIST, and with the Back-Cover Texts being LIST. A copy of the license is included in the section entitled "GNU Free Documentation License".
If you have no Invariant Sections, write "with no Invariant Sections" instead of saying which ones are invariant. If you have no Front-Cover Texts, write "no Front-Cover Texts" instead of "Front-Cover Texts being LIST"; likewise for Back-Cover Texts.
If your document contains nontrivial examples of program code, we recommend releasing these examples in parallel under your choice of free software license, such as the GNU General Public License, to permit their use in free software.
This document was generated on May, 18 2012 using texi2html 1.56k.